Difference between revisions of "Enable Detailed Error Messages in IIS"
Jump to navigation
Jump to search
| Line 2: | Line 2: | ||
# On the server machine running QPR Suite Web Service, go to '''Control Panel''' -> '''Administrative Tools''' -> '''Internet Information Services (IIS) Manager'''. | # On the server machine running QPR Suite Web Service, go to '''Control Panel''' -> '''Administrative Tools''' -> '''Internet Information Services (IIS) Manager'''. | ||
# Select the '''Server name''' -> '''Sites''' -> '''Default Web Site''' -> '''QPR2017-1''' section. Note that you may have other version than QPR Suite 2017.1 in use. | # Select the '''Server name''' -> '''Sites''' -> '''Default Web Site''' -> '''QPR2017-1''' section. Note that you may have other version than QPR Suite 2017.1 in use. | ||
| − | # Double-click '''Error Pages''' and Click '''Edit Feature Settings...''' | + | # Double-click '''Error Pages''' and Click '''Edit Feature Settings...'''. |
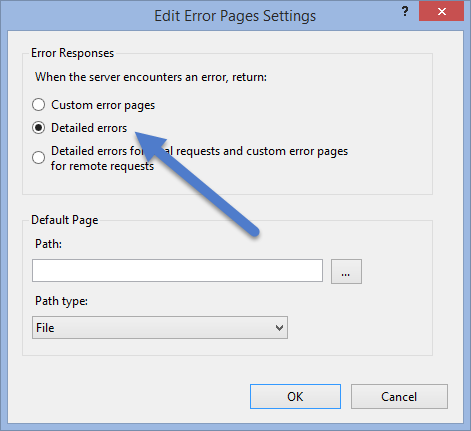
| − | # Select '''Detailed errors''' and click OK | + | # Select '''Detailed errors''' and click OK. |
::[[File:Pic_iis_detailed_errors.png]] | ::[[File:Pic_iis_detailed_errors.png]] | ||
[[Category: QPR UI]] | [[Category: QPR UI]] | ||
Revision as of 22:04, 3 December 2018
To enable detailed error messages IIS when data from QPR Suite Web Service is queried by QPR UI, the default IIS settings need to be changed:
- On the server machine running QPR Suite Web Service, go to Control Panel -> Administrative Tools -> Internet Information Services (IIS) Manager.
- Select the Server name -> Sites -> Default Web Site -> QPR2017-1 section. Note that you may have other version than QPR Suite 2017.1 in use.
- Double-click Error Pages and Click Edit Feature Settings....
- Select Detailed errors and click OK.
