Difference between revisions of "QPR UI Windows Installer"
(403353) |
(403353) |
||
| Line 180: | Line 180: | ||
|The name of the SAML attribute in the assertion that will be used as the user's login name, e.g. "loginname". If the attribute is not given, the NameID of the SAML subject is used. If the user login name in your QPR Suite is the user's email address, the attribute definition is usually not needed. This is the corresponding field for the "User id attribute" in the Federated Authentication Configuration step of the installation. | |The name of the SAML attribute in the assertion that will be used as the user's login name, e.g. "loginname". If the attribute is not given, the NameID of the SAML subject is used. If the user login name in your QPR Suite is the user's email address, the attribute definition is usually not needed. This is the corresponding field for the "User id attribute" in the Federated Authentication Configuration step of the installation. | ||
|} | |} | ||
| + | |||
| + | == Troubleshooting == | ||
| + | '''Q''': My installation stops after Glassfish configuration, how could I get the installation to finish?<br> | ||
| + | '''A''': The installation aborts if the Glassfish connection pool cannot be pinged after creating it. If the connection pool cannot be used, deploying the QPR MobileDashboard application there fails. Before attempting the installation again, please check the following things regarding SQL Server configuration: | ||
| + | * If named instances are used, a TCP port is assigned to the instance and the SQL Server Browser Service is running | ||
| + | * The user has sufficient rights to create tables to the target database. | ||
| + | |||
| + | In addition, if you have a separate Glassfish installation, shut it down for the duration of the QPR MobileDashboard installation so that the administration port 4848 is not reserved. | ||
| + | |||
| + | '''Q''': The Validate button in the Database Server page does not validate my database credentials even though they are correct.<br> | ||
| + | '''A''': Even though the validation should work in the majority of scenarios, you can supply a SKIPDBVALIDATION=1 parameter to the installation from the command line (QPRMobileDashboard.exe /v"SKIPDBVALIDATION=1"). However, when skipping the validation you need to pay some extra attention to the correctness of the credentials as all parts of the software cannot be deployed to Glassfish if the database credentials are incorrect.<br> | ||
| + | <br> | ||
| + | '''Q''': I have QPR Suite and/or QPR ProcessAnalyzer running with SSL enabled and my QPR MobileDashboard installation is SSL-enabled too. Now QPR Suite and/or QPR ProcessAnalyzer is not available as a data source.<br> | ||
| + | '''A''': In the QPR Suite/QPR ProcessAnalyzer, check in the Microsoft IIS web server that the application (e.g. QPR2016-1 or QPRPA) is set to ignore client certificates in its SSL settings. In addition, if your QPR ProcessAnalyzer installation is older than QPR ProcessAnalyzer 2016.3, change the secureWebHttpBindingConfiguration binding in bindings_https.config to contain | ||
| + | <pre> | ||
| + | <security mode="Transport"> | ||
| + | <transport clientCredentialType="None"/> | ||
| + | </security> | ||
| + | </pre> | ||
| + | instead of | ||
| + | <pre> | ||
| + | <security mode="None" /> | ||
| + | </pre> | ||
Revision as of 12:23, 21 March 2017
Prerequisites
There are four major dependencies for QPR MobileDashboard:
- Java Runtime
- Glassfish server
- Microsoft SQL Server
- QPR Suite 2016.1 Web Services accessible in the network
In addition, for installation Microsoft .NET Framework 4.5.1 or newer needs to be enabled on the target computer. The framework will be installed by the QPR MobileDashboard installation if it is not found on the target computer.
Java Runtime (if it does not already exist) and Glassfish server will be installed by the QPR MobileDashboard installation, but a working instance of Microsoft SQL Server is needed either locally or accessible via the network in order for the installation to succeed. The following configuration is required for Microsoft SQL Server:
- If named instances are used, a TCP port needs to be assigned to the instance and the SQL Server Browser Service needs to be running
- Mixed mode authentication or Windows authentication. Note that for Windows Authentication the user performing the installation also needs to have access to SQL Server even if some other account is used for the actual database connection.
System Requirements
See QPR MobileDashboard System Requirements.
Installation
Follow the instructions below to install QPR MobileDashboard:
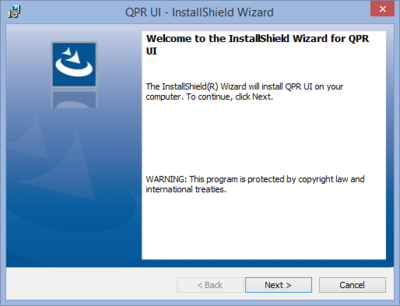
| 1. Welcome Page | |
| This is the starting point of the QPR MobileDashboard installation wizard. Click Next to continue. |
|
| 2. License Agreement | |
| Here you can see the End User Software License terms for the software that is about to be installed. You will need to accept these terms before continuing the installation. Select "I accept the terms in the license agreement" and click Next to continue in the case you accept the license terms. Otherwise you'll need to cancel the installation | 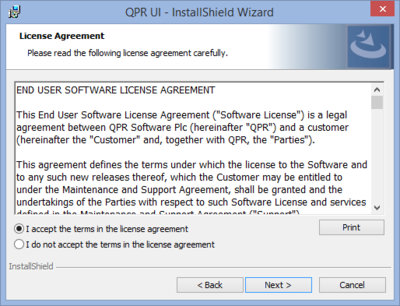
|
| 3. Destination Folder | |
| In this page you can see the folder where QPR MobileDashboard is going to be installed. If you want to install to a different folder, click on the Change button and define a new target folder there. Click Next to continue when the destination folder is correct. | 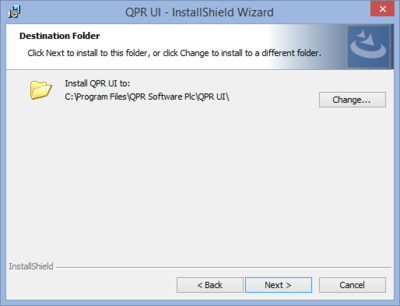
|
| 4. Database Configuration | |
| Here you select whether to create a new database for QPR MobileDashboard or to use an existing database. In most scenarios the "Set up a new database" option should be used. Using an existing database is useful mainly in server migration scenarios. Click Next to continue after selecting the desired option. The installation proceeds similarly with both options, but with an existing database the database initialization script is not run at a later stage during the installation. | 400px |
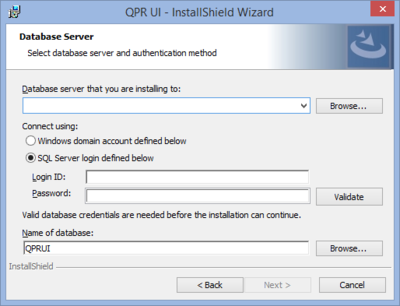
| 5. Database Server | |
| In this page you need to supply the information necessary to connect to the Microsoft SQL Server where you're going to install QPR MobileDashboard. The Database server drop-down contains compatible servers that were discovered locally, but if you are using a remote database server, you can input the host name and the possible instance name here. You can use either Windows authentication or SQL Server authentication for connecting to the target SQL Server. Select the authentication mode, input the corresponding login ID and password to their respective fields, and click on Validate to verify that the account can be used for connecting to the defined database server and database. The Next button gets enabled only after a successful validation of credentials. Note that domain accounts should be supplied without and domain-specific prefix or suffix, i.e. the username alone. Also note that when using Windows Authentication, the account supplied here will be used for communication between Glassfish and QPR MobileDashboard, but also the user account running the installation needs to have proper access to the database to create the necessary tables there during the installation. In the Name of database field you can define what the database for QPR MobileDashboard will be called in the target server. This should be the database to which the user has rights to. However, with extensive rights a database with the defined name will be created on the server if it doesn't exist. Click Next to continue. |
|
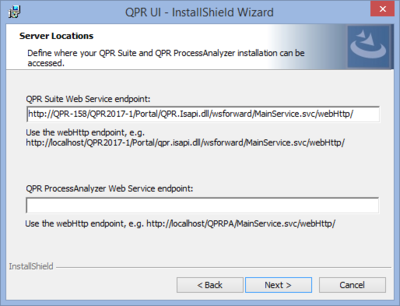
| 6. Server Locations | |
| Here you can define where the QPR Suite and QPR ProcessAnalyzer Web Services can be accessed. If QPR Suite installations are found on the target computer, the web service endpoint of the newest version is suggested by default, but you should verify that this value points at the installation where your QPR MobileDashboard data should come from. If you have QPR ProcessAnalyzer available, define its endpoint URL to the corresponding field. NOTE: If your QPR MobileDashboard installation is running in a clustered environment, set UseXForwardedForAsClientIp to true in the web.config of the QPR ProcessAnalyzer instance that is used. Also note that when using SSL, both QPR Suite and QPR ProcessAnalyzer should be set to ignore client certificates in their IIS configuration. Click Next to continue. |
|
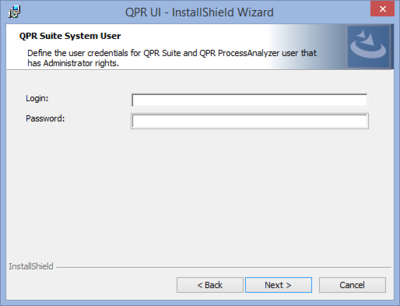
| 7. QPR Suite System User | |
| Here you need to define the user credentials of a QPR Suite Administrator user. Click Next to continue |
|
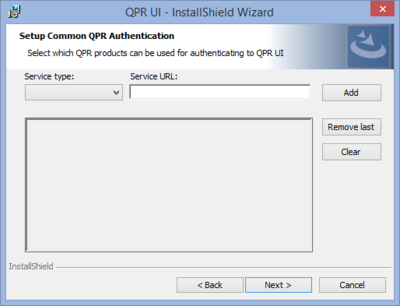
| 8. Single Sign-on Setup | |
| If you want to use links from other QPR Suite web clients (i.e. QPR ProcessAnalyzer Web Client, QPR Portal) to access QPR MobileDashboard, define the URLs used for QPR Suite Single Sign-on Authentication, the single sign-on system between different QPR Suite product web clients (i.e. QPR ProcessAnalyzer Web Client, QPR Portal, and QPR MobileDashboard). When the QPR Suite Single Sign-on Authentication is in use linking from the other QPR web clients to QPR MobileDashboard can be done without the need of a separate login for the product that is the link target. To add an URL, select the Service type (e.g. "QPR Portal") , define the Service URL (e.g. "http://<service_hostname>/QPR2016-1/Portal/QPR.Isapi.dll/"), and click Add. If you need to change an existing definition, you can either remove the latest definition by clicking Remove last or remove all the definitions by clicking Clear, and then define the definition(s) again. Click Next to continue. |
|
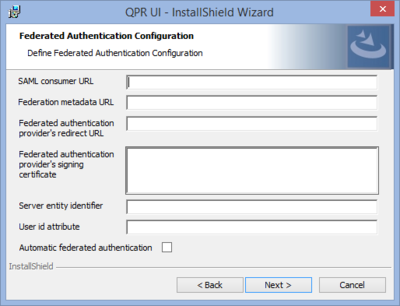
| 9. Federated Authentication Configuration | |
This page allows configuring Single Sign-On (SSO) login that enables logging in to QPR MobileDashboard using the existing credentials provided by your organization's federated identity provider. If there’s no applicable federated identity provider in your organization or you wish to configure it later, this page can be left blank. See the Configuring Federated Authentication (SSO) section for more information and instructions on how the login scheme can be switched later.
|
|
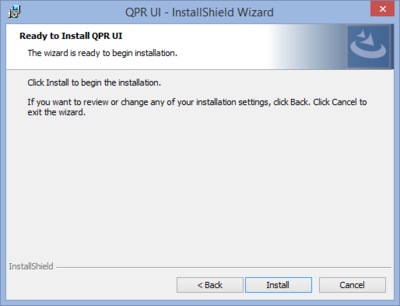
| 10. Ready to Install | |
| The installer is now ready to start copying the application files to the computer. If you need to change any settings, click Back and make the necessary changes. Once you are satisfied with the settings, click Install to start the installation |
|
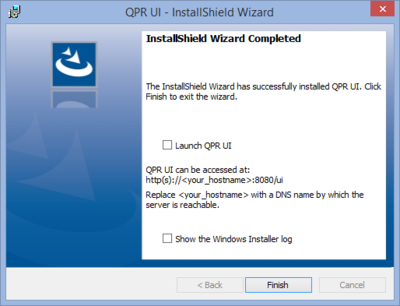
| 11. Complete | |
| The installation is now complete. Check the "Launch QPR MobileDashboard" checkbox to have your default browser opened to the QPR MobileDashboard login page. If you choose not to launch the site straight away, you can access it later on at: http(s)://<your_server_dns_name>:8080/mobiledash. |
|
Upgrading
When upgrading to a new version of QPR MobileDashboard, a database upgrade may be needed. In those cases, a direct upgrade is prevented and you should uninstall the old version of QPR MobileDashboard. After that, install the new version, and select the "Use an existing database" option during installation. The database is then upgraded after the installation is finished and the QPR MobileDashboard service starts.
Maintenance
If you need to repair QPR MobileDashboard installation for whatever reason, restart the "domain1 Glassfish Server" service after the repair before using the product.
Intenet Information Services Configuration
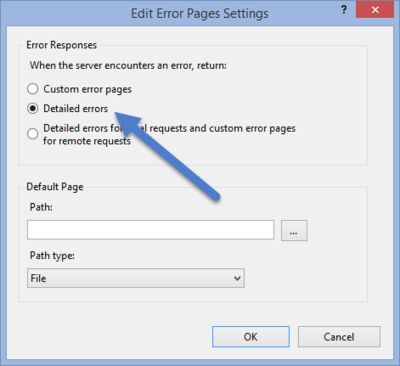
To enable more meaningful and relevant error messages in QPR MobileDashboard user interface when data from QPR Suite web services is queried, the default IIS setting for error code 500 in the QPR Suite web services needs to be changed.
To change the error setting:
- On the server machine running QPR Suite web services, go to Control Panel -> Administrative Tools -> Internet Information Services (IIS) Manager.
- Select the Server name > Sites > Default Web Site > <Your QPR installation application (e.g. QPR2016-1)> section.
- Double-click Error Pages.
- Click Edit Feature Settings...
- Select Detailed errors and click OK:
Glassfish Configuration
By default Glassfish is using port 8080 for the front-end and port 4848 for the administration UI. If these ports cannot be used, they can be changed by accessing the administration UI at http://<servername>:4848. Expand Configurations -> server-config -> Network config -> Network listeners, select the listener to configure and change the Port value.
It is also highly recommended to change the default administrator password for Glassfish at Domain -> Administrator Password.
SSL Configuration
In order to configure your installation to use SSL for encrypting the communication, follow the instructions below. Note that the instructions assume that your SSL certificate is in the .pfx format. For other formats some commands have to be altered accordingly.
- Make sure your Java JRE bin folder is in the environment's PATH setting, so that keytool will be found.
- Launch two elevated command prompts, navigate one to <QPR MobileDashboard installation root>\Glassfish\bin and the other to <QPR MobileDashboard installation root>\Glassfish\glassfish\domains\domain1\config
- Make backup copies of keystore.jks, cacerts.jks, and domain.xml in <QPR MobileDashboard installation root>\Glassfish\glassfish\domains\domain1\config
- Open the Glassfish administration panel at http://<hostname>:4848. If you haven't done so, change the administrator password. Use a password longer than six characters here.
- In the Glassfish admin panel, go to server (Admin Server) -> Secure Administration -> Enable secure administration. Note that at this point the secure admin will still be using a self-signed certificate, which will cause warnings in browsers. As we know the reason for the warning, we can ignore it this time and proceed to the secure administration despite the certificate error.
- Stop the domain from the server (Admin Server) page or by running the following command line in the bin folder:
asadmin stop-domain
- With the command line in the bin folder, run:
asadmin change-master-password --savemasterpassword=true
and define a new password to replace the default "changeit" password. NOTE: This should be a different password than the admininistrator password used for regular logins. This is basically a master key to the installation and also the certificate will be using this password in a later stage, so choose an appropriately strong password that is known only by those who have access to the SSL certificate password.
- Change to the command line in the config folder. Run:
keytool -importkeystore -srckeystore <your_pfx_file_name_and_path> -srcstoretype pkcs12 -destkeystore keystore.jks -deststoretype JKS
You'll be asked for the destination keystore password, input the password defined in previous step here. Use the same password when you're asked to re-enter the new password. Source keystore password is your SSL certificate's password. Copy the alias to e.g. Notepad, you'll be needing this later.
- In the config folder, import the certificate also to the cacerts.jks keystore, i.e. run:
keytool -importkeystore -srckeystore <your_pfx_file_name_and_path> -srcstoretype pkcs12 -destkeystore cacerts.jks -deststoretype JKS
- In the config folder, run the following commands:
keytool -keypasswd -alias <key alias from step 8>
-keystore keystore.jks keytool -keypasswd -alias <key alias from step 8> -keystore cacerts.jks
- You're asked for the keystore password, this is once again the password defined in step 7. When the key password is requested, enter the original SSL certificate password and then enter the password from step 7 as the new key password.
- Start the domain by running the following command line in the bin folder:
asadmin start-domain
- Access the Glassfish admin panel at https://<servername>:4848
- Expand Configurations -> server-config -> Network Config -> Network Listeners -> http-listener-2
- Switch to the SSL tab and enable SSL3. Also change Certificate nickname to be the alias from step 8 and save the changes.
- You can now also disable http-listener-1 to prevent access without SSL, but that is safer to do after you have verified that the SSL config works.
- Stop the domain and open <QPR MobileDashboard installation root>\Glassfish\glassfish\domains\domain1\config\domain.xml into a text editor that's running as an administrator. Search and replace all references to s1as with the alias from step 8.
- Save the file and restart the domain. You should now be able to access the SSL instance at https://<servername>:8181/mobiledash/
Configuring Federated Authentication (SSO)
QPR MobileDashboard supports Single sign-on login via federated identity providers (e.g. Shibboleth and Microsoft Active Directory Federation) that support the Security Assertion Markup Language (SAML) 2.0.
The preferred way to enable Single sign-on is to define the following entries using the QPR MobileDashboard installer. The entries can also be added to the CONFIGURATIONENTITY table in the QPR MobileDashboard database after installing QPR MobileDashboard.
| KEY_FIELD | VALUE_FIELD |
|---|---|
| SAML_CONSUMER_URL | "<Location of your QPR MobileDashboard installation>/EnticeServices/rest/authenticate/saml", e.g. "http://localhost:8080/EnticeServices/rest/authenticate/saml". This is the corresponding field for the "SAML consumer URL" in the Federated Authentication Configuration step of the installation. |
| SAML_METADATA_URL | "<The metadata URL of the identity provider>", e.g. "https://your.federated.identity.provider.com/saml/metadata". This is the corresponding field for the "Federation metadata URL" in the Federated Authentication Configuration step of the installation. |
| SAML_SERVER_ENTITY_IDENTIFIER | "<The server entity identifier URL>", e.g. "http://your.federated.identity.provider.com/services/trust". This entry is used if the metadata contains multiple server entries. This is the corresponding field for the "Server entity identifier" in the Federated Authentication Configuration step of the installation. |
| SAML_USER_ID_ATTRIBUTE | The name of the SAML attribute in the assertion that will be used as the user's login name, e.g. "loginname". If the attribute is not given, the NameID of the SAML subject is used. If the user login name in your QPR Suite is the user's email address, the attribute definition is usually not needed. This is the corresponding field for the "User id attribute" in the Federated Authentication Configuration step of the installation. |
An alternative way is to is to define the following entries using the QPR MobileDashboard installer. The entries can also be added to the CONFIGURATIONENTITY table in the QPR MobileDashboard database after installing QPR MobileDashboard.
| KEY_FIELD | VALUE_FIELD |
|---|---|
| SAML_CONSUMER_URL | "<Location of your QPR MobileDashboard installation>/EnticeServices/rest/authenticate/saml", e.g. "http://localhost:8080/EnticeServices/rest/authenticate/saml". This is the corresponding field for the "SAML consumer URL" in the Federated Authentication Configuration step of the installation. |
| SAML_REDIRECT_URL | "<The redirect URL of the identity provider>", e.g. "https://your.federated.identity.provider.com/saml/http-post/sso". This is the corresponding field for the "Federated authentication provider's redirect URL" in the Federated Authentication Configuration step of the installation. |
| SAML_SIGNING_CERTIFICATE | "<X.509 Certificate>". This is the corresponding field for the "Federated authentication provider's signing certificate" in the Federated Authentication Configuration step of the installation. |
| SAML_USER_ID_ATTRIBUTE | The name of the SAML attribute in the assertion that will be used as the user's login name, e.g. "loginname". If the attribute is not given, the NameID of the SAML subject is used. If the user login name in your QPR Suite is the user's email address, the attribute definition is usually not needed. This is the corresponding field for the "User id attribute" in the Federated Authentication Configuration step of the installation. |
Troubleshooting
Q: My installation stops after Glassfish configuration, how could I get the installation to finish?
A: The installation aborts if the Glassfish connection pool cannot be pinged after creating it. If the connection pool cannot be used, deploying the QPR MobileDashboard application there fails. Before attempting the installation again, please check the following things regarding SQL Server configuration:
- If named instances are used, a TCP port is assigned to the instance and the SQL Server Browser Service is running
- The user has sufficient rights to create tables to the target database.
In addition, if you have a separate Glassfish installation, shut it down for the duration of the QPR MobileDashboard installation so that the administration port 4848 is not reserved.
Q: The Validate button in the Database Server page does not validate my database credentials even though they are correct.
A: Even though the validation should work in the majority of scenarios, you can supply a SKIPDBVALIDATION=1 parameter to the installation from the command line (QPRMobileDashboard.exe /v"SKIPDBVALIDATION=1"). However, when skipping the validation you need to pay some extra attention to the correctness of the credentials as all parts of the software cannot be deployed to Glassfish if the database credentials are incorrect.
Q: I have QPR Suite and/or QPR ProcessAnalyzer running with SSL enabled and my QPR MobileDashboard installation is SSL-enabled too. Now QPR Suite and/or QPR ProcessAnalyzer is not available as a data source.
A: In the QPR Suite/QPR ProcessAnalyzer, check in the Microsoft IIS web server that the application (e.g. QPR2016-1 or QPRPA) is set to ignore client certificates in its SSL settings. In addition, if your QPR ProcessAnalyzer installation is older than QPR ProcessAnalyzer 2016.3, change the secureWebHttpBindingConfiguration binding in bindings_https.config to contain
<security mode="Transport">
    <transport clientCredentialType="None"/>
</security>
instead of
<security mode="None" />
