Difference between revisions of "View and Panel Designer in QPR UI"
(307292) |
|||
| Line 17: | Line 17: | ||
View and panel width is always determined by the relative height principle. The views and panels are never scrollable horizontally, but the content always takes the whole available space. | View and panel width is always determined by the relative height principle. The views and panels are never scrollable horizontally, but the content always takes the whole available space. | ||
| + | |||
| + | == View and Panel Modes == | ||
| + | The views and panels have two modes: '''Edit''' mode and '''Viewing''' mode. For viewer users, all the views and panels are shown like they would be locked, and the viewer users can't edit the view or panels. For administrator users, the unlocked views and panels are by default in Edit mode in which it's possible to add panels, presentation objects etc. To see how the view looks like for the viewer users, it's possible to toggle between the Edit and Viewing modes by clicking on the '''Edit''' button on the main toolbar:<br> | ||
| + | [[File:EditModeToggle.png|800px]] | ||
{{MDBTutorialViewPropertiesAndContext}} | {{MDBTutorialViewPropertiesAndContext}} | ||
Revision as of 12:27, 10 July 2018
A QPR UI view is the topmost area consisting of panels that have presentation objects inside them. The location and size of the panels within the view can be adjusted.
View and Panel Settings
- Properties
- Name: Name of the view/panel/repeater. Maximum length is 100 characters. Note that it's not possible to use tags in view and repeater names. Tags can be used in panel names. View name is visible in workspaces screens and view header. Panel name is visible in panel header (if it's set visible).
- Identifier: The identifier of the view/panel/repeater. The identifier should be a unique text that distinguishes the view/panel/repeater in the QPR UI. Identifiers are case sensitive, must not contain "/" characters, and the maximum length is 2048 characters. For view identifiers, it's possible to use the identifier to link to the latest version of the view from other views by using the sys:dashboardIdentifier variable. For panel identifiers, the identifier is visible in the Select panel to be added to view dialog for better identification.
- Description: Description of the view/panel/repeater. The description is not visible for the dashboard viewers, but it can be used e.g. to include documentation to the dashboard designer persons.
- Datasets
- Presentation
- Context
View and Panel Scaling in Different Screen Sizes
Views and panels have the following scaling options:
- In the fixed height mode all panels have fixed height in pixels, and the height of panels doesn't change between different screen sizes. The fixed height mode is switched on by defining view or panel Aspect ratio flex to 1 (more information about Aspect Ratio Flex).
- In the relative height mode, all panels height adjust to the available screen height in a way that the content always takes the entire screen height so the screen is never scrollable nor there is empty space in the bottom of the screen. The relative height mode is switched on by defining view or panel Aspect Ratio Flex to a high enough number, such as 100.
- There is also a hybrid mode, where panels' height adjust to some degree to the available space, but there is a certain adjustable limit for panels' height. The hybrid mode is used when the Aspect ratio flex is set to greater than 1 but not too big number. For example 1.2 - 2.0 might be suitable.
View and panel width is always determined by the relative height principle. The views and panels are never scrollable horizontally, but the content always takes the whole available space.
View and Panel Modes
The views and panels have two modes: Edit mode and Viewing mode. For viewer users, all the views and panels are shown like they would be locked, and the viewer users can't edit the view or panels. For administrator users, the unlocked views and panels are by default in Edit mode in which it's possible to add panels, presentation objects etc. To see how the view looks like for the viewer users, it's possible to toggle between the Edit and Viewing modes by clicking on the Edit button on the main toolbar:
800px
Defining View Properties and Variables
To define context variables, type in the name of the variable to the text field and click the check mark. After that, you can click the value field and type in the value for your context variable. Context variables starting with "sys:" are system variables which have special purpose in QPR UI - use them only for their intended purpose. The Behavior selection affects the context variable used explained in Context Variable Behaviors. To see what context variable values are used in the view, panel, or presentation object, select the Show effective context check box in the Context tab of the view, panel, or presentation object properties pages.
Variables Usage Example
There is a view with one panel, in which there is one presentation object. The Session variable values are defined as follows:
| Variable name | Value |
|---|---|
| AccountManager | John Smith |
| Country | Sweden |
In the View Properties, the following variable values are defined:
| Variable name | Value | Behavior |
|---|---|---|
| AccountManager | William Taylor | Stored variable |
| CustomerGroup | Kids | Local variable |
In the Panel Properties, the following variable values are defined:
| Variable name | Value | Behavior |
|---|---|---|
| AccountManager | Susan Chapman | Local variable |
| Country | Finland | Local variable |
In the Presentation Object Properties, the following variable values are defined:
| Variable name | Value | Behavior |
|---|---|---|
| ProductGroup | Umbrellas | Stored variable |
In the Effective View Context, these result into the values shown below. Note the Source column displaying the information where the effective context comes from:
| Variable name | Value | Source | Scope |
|---|---|---|---|
| AccountManager | William Taylor | Scope of the view | View |
| Country | Sweden | Inherited from session context | Session |
| CustomerGroup | Kids | Scope of the view | View |
In the Effective Panel Context, these result into the values shown below. Note the Source column displaying the information where the effective context comes from:
| Variable name | Value | Source | Scope |
|---|---|---|---|
| AccountManager | Susan Chapman | Initialized from the panel's context | Panel |
| Country | Finland | Initialized from the panel's context | Panel |
| CustomerGroup | Kids | Inherited from the effective context of the view | View |
In the Effective Presentation Object Context, these result into the values shown below. Note the Source column displaying the information where the effective context comes from:
| Variable name | Value | Source | Scope |
|---|---|---|---|
| AccountManager | Susan Chapman | Inherited from the effective context of the panel | Panel |
| Country | Finland | Inherited from the effective context of the panel | Panel |
| ProductGroup | Umbrellas | Scope of the presentation object | Presentation object |
| CustomerGroup | Kids | Inherited from the effective context of the view | View |
To put it more concisely, the context variable values (and their behaviors) are as follows:
| Context Variable | Session | View | Panel | Presentation Object |
|---|---|---|---|---|
| AccountManager | John Smith | William Taylor (Stored variable) | Susan Chapman (Local variable) | |
| Country | Sweden | Finland (Local variable) | ||
| ProductGroup | Umbrellas (Stored variable) | |||
| CustomerGroup | Kids (Local variable) |
The effective context values are:
| Context Variable | Session | View | Panel | Presentation Object |
|---|---|---|---|---|
| AccountManager | John Smith | William Taylor | Susan Chapman | Susan Chapman |
| Country | Sweden | Sweden | Finland | Finland |
| ProductGroup | Umbrellas | |||
| CustomerGroup | Kids | Kids | Kids |
Example: Adding Panel and Defining Properties and Context
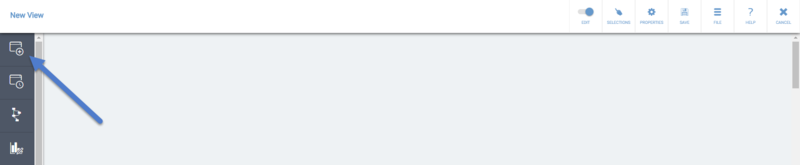
- Add a new Panel to the view by clicking the Add New Panel button in the side toolbar.
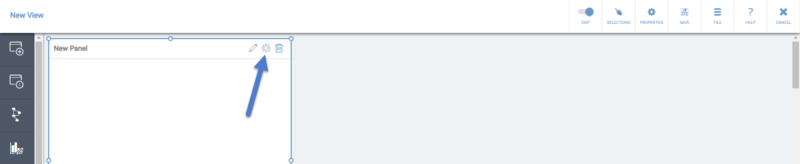
- Click the panel to select it and then click the Properties button on the panel.
- In the Panel Properties, you can define the Name, Identifier, and Description on the Properties tab.
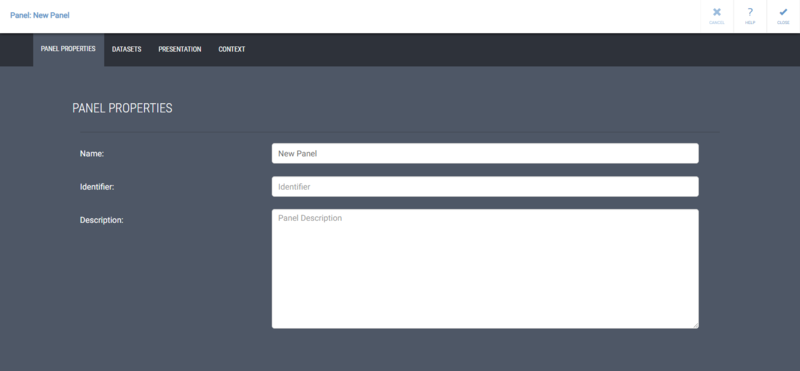
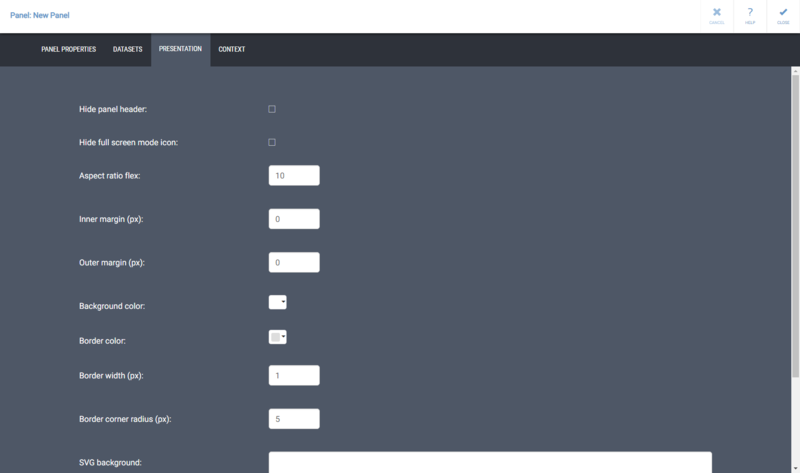
In addition to normal text, you can use Variable and Expression tags in the panel name to enable the name to change dynamically or construct the name using an expression. For example, you could define the panel name to be Selected scorecard: <#sys:metricsScorecard>. - Switch to the Presentation tab. On the Presentation tab, change the Background color. Set also the Inner margin to be "5", this setting will make the presentation objects be closer to each other than with the default setting. You can also adjust the other presentation settings, see the Panel Properties page for their descriptions.
You can also define panel specific context variable values on the Context tab. Apply the changes and close the panel properties by clicking Close.


