Getting Started with QPR ProcessAnalyzer: Difference between revisions
No edit summary |
No edit summary |
||
| Line 18: | Line 18: | ||
<div style="flex: 1 0 270px;border:1px solid #dfdfdf;padding:0 1em 1em 1.5em;background-color:#F7FAFC;margin:10px 0px 0px 10px;"> | <div style="flex: 1 0 270px;border:1px solid #dfdfdf;padding:0 1em 1em 1.5em;background-color:#F7FAFC;margin:10px 0px 0px 10px;"> | ||
=== Chart settings === | === Chart settings === | ||
*[https://www.youtube.com/watch?v=zbQVZ1gtGGM Introduction video to chart settings] | |||
*[[QPR ProcessAnalyzer Chart]] | *[[QPR ProcessAnalyzer Chart]] | ||
</div> | </div> | ||
Revision as of 09:11, 23 September 2020
Getting started
Here you can find the 4 minute instruction video for how to find your way around QPR ProcessAnalyzer when logging in for the first time. To start familiarizing yourself with QPR ProcessAnalyzer it is recommended to have a look at the pre-made dashboards created by the QPR staff for pre-existing applications, eg. Purchase-to-Pay (PtP). Feel free to experiment with different filters and discover insights hidden in the data. The basics of filtering in QPR ProcessAnalyzer are explained in the first 5 minutes of the video linked below. To support your learning journey we have made the following resources publicly available for self-study.
Process Discovery
Flowchart
Chart
Filtering
Chart settings
Designing Dashboards
Model Creation
In order to create functioning data models for Process Mining the minimum requirement is that you have an event log which contains the following information:
- Case ID - An unique identifier which connects the series of events together, eg. Purchase Order number, invoice number etc.
- Event name - The name of different process steps, eg. Delivery: Goods Issue, Invoice Receipt, SO Item Created etc.
- Timestamp - A registered time of the occurrence of an event
- Attributes - Any additional information attached to a Case ID, eg. Company Code, Customer information, Order status information etc. Attributes are not mandatory for creating functioning models but the more attributes there are in the model the higher quality analysis can be done.
Based on this information QPR ProcessAnalyzer creates a flowchart which with combination of other available tools lays the foundation for the start of Process Mining. Most common ways of creating models in QPR ProcessAnalyzer are using the webUI to import data and more advanced techniques such as SQL to import data directly from various data sources.
Logging in
1. Open your web browser (Google Chrome and Mozilla Firefox are the preferred options)
2. Go to https://[yourdomain].onqpr.com/ or https://processanalyzer.onqpr.com/
3. Log in using the credentials QPR has provided to you in your e-mail.
After a successful log-in you are presented with the following options:
- Process Discovery
- Conformance Checking
- Clustering Analysis
- Enhanced BPMN
- Data Import
- Model Manager
- Project Workspace
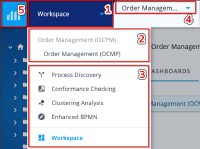
You can navigate in QPR ProcessAnalyzer by either clicking the respective elements on the frontpage or by clicking on the navigation menu on the top left. When choosing the navigation menu you will see the following elements:
1. Navigation menu drop-down
2. Existing dashboards within the active project
3. QPR ProcessAnalyzer elements
4. Projects and Models
5. Link to Workspace
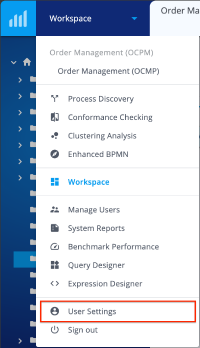
Changing your password
To change your password do the following:
1. Click Home
2. Scroll down and choose User Account
3. Enter your current password
4. Enter your new password
5. Confirm your new password
6. Click Change Password


